CAR-SPECIAL® – Vehicle templates
Buying, prices
Search for vehicle drawings
Vehicle search – additional functions, tips
- compare
- Photographing vehicles correctly
- Find vehicle drawings from photos only
- Vehicle dimensions – entered in millimetres
- Year of manufacture, not first registration!
- New model in the same year? Differentiate between model series/facelifts
- Differences – electric, hybrid, plug-in hybrid ...
- Scale vehicle display size
- Bookmark vehicles
- Create new watchlist
- Sort watchlists
- Delete vehicles from a watchlist
Login, download
Design and presentation
- Programmes - which are suitable?
- Create vehicle designs with CorelDRAW
- Create vehicle designs with Adobe Illustrator
- Adobe Illustrator - Show sublayers
- Bodywork for lorries and commercial vehicles
- Create commercial vehicle variants yourself
- Vehicle foiling – tips
- CAR 3D - Presentation
- Design vehicles online with CAR-SIGNER
- More tips ...
Vehicle drawings – technical information
- File format – in which file formats do I receive my blueprints?
- Vehicle files - which dimensions are specified?
- Vehicle information
- Vehicle dimensions - deviating specifications
- Precision – do I have to verify the measurements on the vehicle?
- Attention: Lorries are always individually configured!
- Vehicle drawings for emergency vehicles
- Scale – Convert dimensions to original size
Buying, prices
Here you will find all the information you need at a glance:
Buy individual vehicle drawings
Place individual vehicles in the shopping basket. After payment you can download them directly.
Subscription
You can also purchase a subscription via the shopping basket. Once you have placed your order, we will activate it for you. You will then receive a link from us by e-mail, which you can use to assign a password. You can then download the vehicles directly after logging in.
Comparison: Subscription or individual purchase?
Find vehicle drawings
All vehicle files - regardless of whether you purchase them as part of a subscription or individually - can be found in our online vehicle search.
Price overview, payment options
Here you will find all prices for subscriptions and individual vehicle files.

Advantages for subscribers
Save money
If you need more than 9 vehicle drawings per year, the subscription pays for itself after the second year. If you need more than 12 vehicle drawings per year, you even save money after the first year!
Including CAR-3D
Present your designs in 3D with just a few clicks without complicated 3D software.
including CAR-SIGNER®
Create vehicle layouts quickly and easily online without a vector programme.
Large vehicle previews
Point the cursor at a vehicle image in the search result to open a large preview.
Display of vehicle dimensions
The length, height, width and wheelbase in millimetres are displayed next to each vehicle image in the search result.
Quick measurement tool and even larger previews
Click on a vehicle image in the search result and then on the "measure" button to open the quick measurement tool. You can now use a virtual ruler to roughly measure vehicle details in a very large preview.
Watchlist
Permanently save vehicle images that you need for your projects (tab at the top right of the online search).
"Recently searched" function
Click on "recently searched" in the search bar to conveniently redisplay vehicles that have already been found.
Convinced? Subscribe to CAR-SPECIAL® now
Which is cheaper, subscription or individual purchase?
If you need more than 9 vehicle drawings per year, the subscription pays for itself after the second year. With more than 12 vehicle drawings per year, you even save after the first year!
Free test files
Before you spend any money, you can download vehicle drawings here free of charge and test them extensively.
Search for vehicle drawings
Search vehicles - video tutorial
Search vehicles - video tutorial
Finding the vehicle drawings you want is easier than you think. The video briefly and concisely explains the most important functions of the online search. Watch it now!
Keyword search

Where: CAR-SPECIAL® search > Input field at the top
Advantages compared to alphabetical search:
- faster
Tips:
- Enter the model designation directly without the manufacturer.
- Combine search terms, e.g. "Ducato 2025 L4". You can search for all terms that also appear in the vehicle illustrations.
Alphabetical search
Where: CAR-SPECIAL® search > "A-Z current" tab.
How: Click on a vehicle manufacturer in the list.
Advantages compared to keyword search:
- You see all vehicle images directly
- You avoid typing errors
Tip:
If the model names are unclear, click on a vehicle manufacturer to obtain a complete model overview.
Search for vehicles - required information
This makes it easy for you to find out what information you need:
- First select the desired model in the vehicle search.
- Then select all the details you know from the search filters on the left-hand side.
- "please choose" is displayed for the missing details.
Important: Only the information requested in the search filters will help you to find vehicles.
The following details are required as a minimum:
Car
- Manufacturer, model, year of construction (e.g. VW Golf year 2023)
- Body variant (estate, convertible ...)
Note: Equipment packages such as sports and exclusive packages have no relevant influence on the basic body and can only be implemented in individual cases.
Commercial vehicles
- Manufacturer, model, year of construction (e.g. Renault Trafic, year 2026)
- Length and height
- Number of sliding doors
- Rear: rear doors or tailgate, glazed or sheet metal
- Sides: sheet metal, glazed or partially glazed
- Depending on the manufacturer, rear or front-wheel drive if applicable
- Body (box body, flatbed, ...) if applicable
Lorry
- Manufacturer, model, year of construction (e.g. Mercedes Actros, year 2025)
- Cab variant (manufacturer's designation)
- Body: tractor unit, chassis for bodies, aero package, ...
Buses and coaches
- Manufacturer, model, year of construction (e.g. MAN Lion's City, year 2023)
- Length, width and height
Note: Due to the large variety of models, photos are also essential.
Do you need our help?
Send us an e-mail now
... or give us a call: +49 761 479240
Search filter

Here you should select what you know about the vehicle you are looking for. The number of hits will become smaller with each step.
Search for vehicles with your smartphone
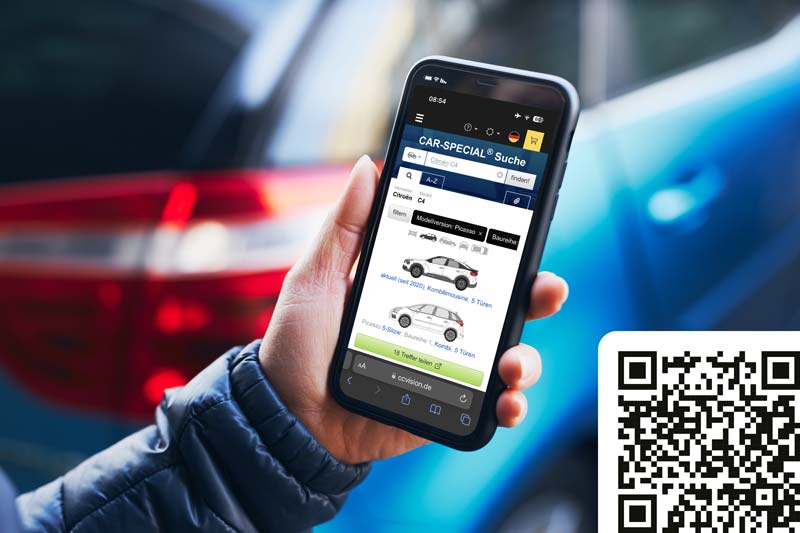
Our professional vehicle search is also optimised for mobile devices. Visit ccvision.de with your smartphone and conveniently share the models you find with colleagues or customers by e-mail or WhatsApp.
Find lorry and bus models
These vehicle segments are very specialised. Trucks and buses can often be ordered in thousands of variants, and customised configurations are also possible. This is why we can only offer basic models. In individual cases, however, we also research other variants. To do this, we need the chassis number or photos of all views of the vehicle.
Further information:
Vehicle search – additional functions, tips
compare
compare
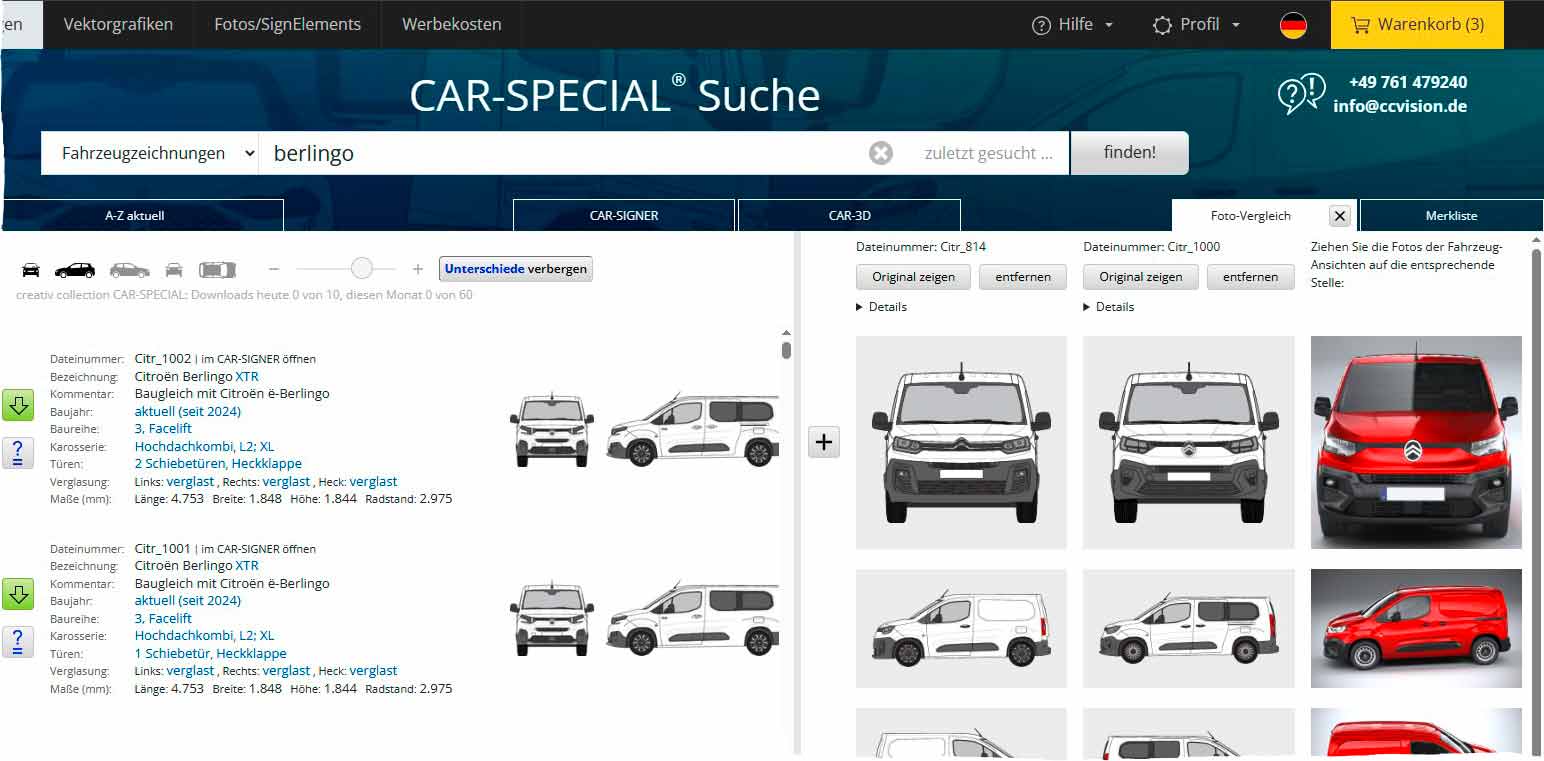
Question mark button > Add drawing for comparison; Plus button > Add drawing(s) via drag and drop
Comparison functions
- Upload photos of the vehicles you are looking for using drag-and-drop
- Find the vehicles you are looking for by comparing them with the drawings
- Compare vehicle drawings with each other
- You can compare photos of a vehicle and up to three vehicle drawings at the same time
How does it work?
- Search by manufacturer/model and then click on the "compare" tab.
- To see vehicle drawings in comparison, click on the button with the question mark to the left of the images in the search results.
Alternatively, you can also click on the plus button in the compare function and then drag and drop drawings onto the fields. Drawings or photos that already exist in the photo comparison can be replaced using drag & drop. - Click on the "Show original" button to display the file in the search result for download.
Tip: Show differences
To display the differences between the drawings in the comparison, click on "Details" above the drawings. Note: The differences highlighted in blue refer to the entire search result, not just to the drawings in the comparison.
Tip: Compare drawing with drawing
You can compare up to three vehicle drawings with each other. This allows you to quickly recognise the differences between different model series or between the base model and facelift.
Tip: large photo illustrations
Load only one vehicle drawing into the comparison. Drag the column to the maximum width. Crop photos in which the vehicle is only shown in small format before uploading them.
Tip: Compare different vehicles
For example, you can check whether the planned design matches the different body shapes.
Photographing vehicles correctly
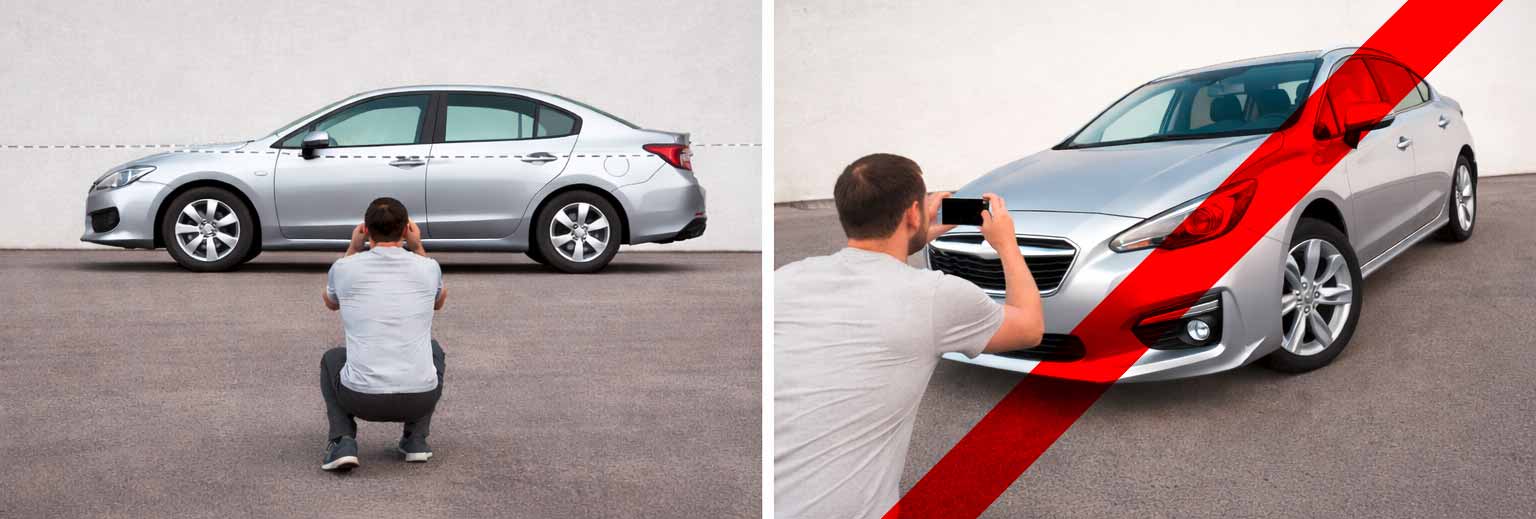
To make it easier to compare your vehicle photos with the drawings, please note the following tips:
- Stand in the centre of the side of the vehicle you want to photograph.
- Take photos with zoom from a distance of a few metres to avoid typical wide-angle distortions.
- Hold the camera or smartphone as horizontally and vertically centred to the vehicle as possible.
Ideally, the photos of the individual vehicle views should look like this:
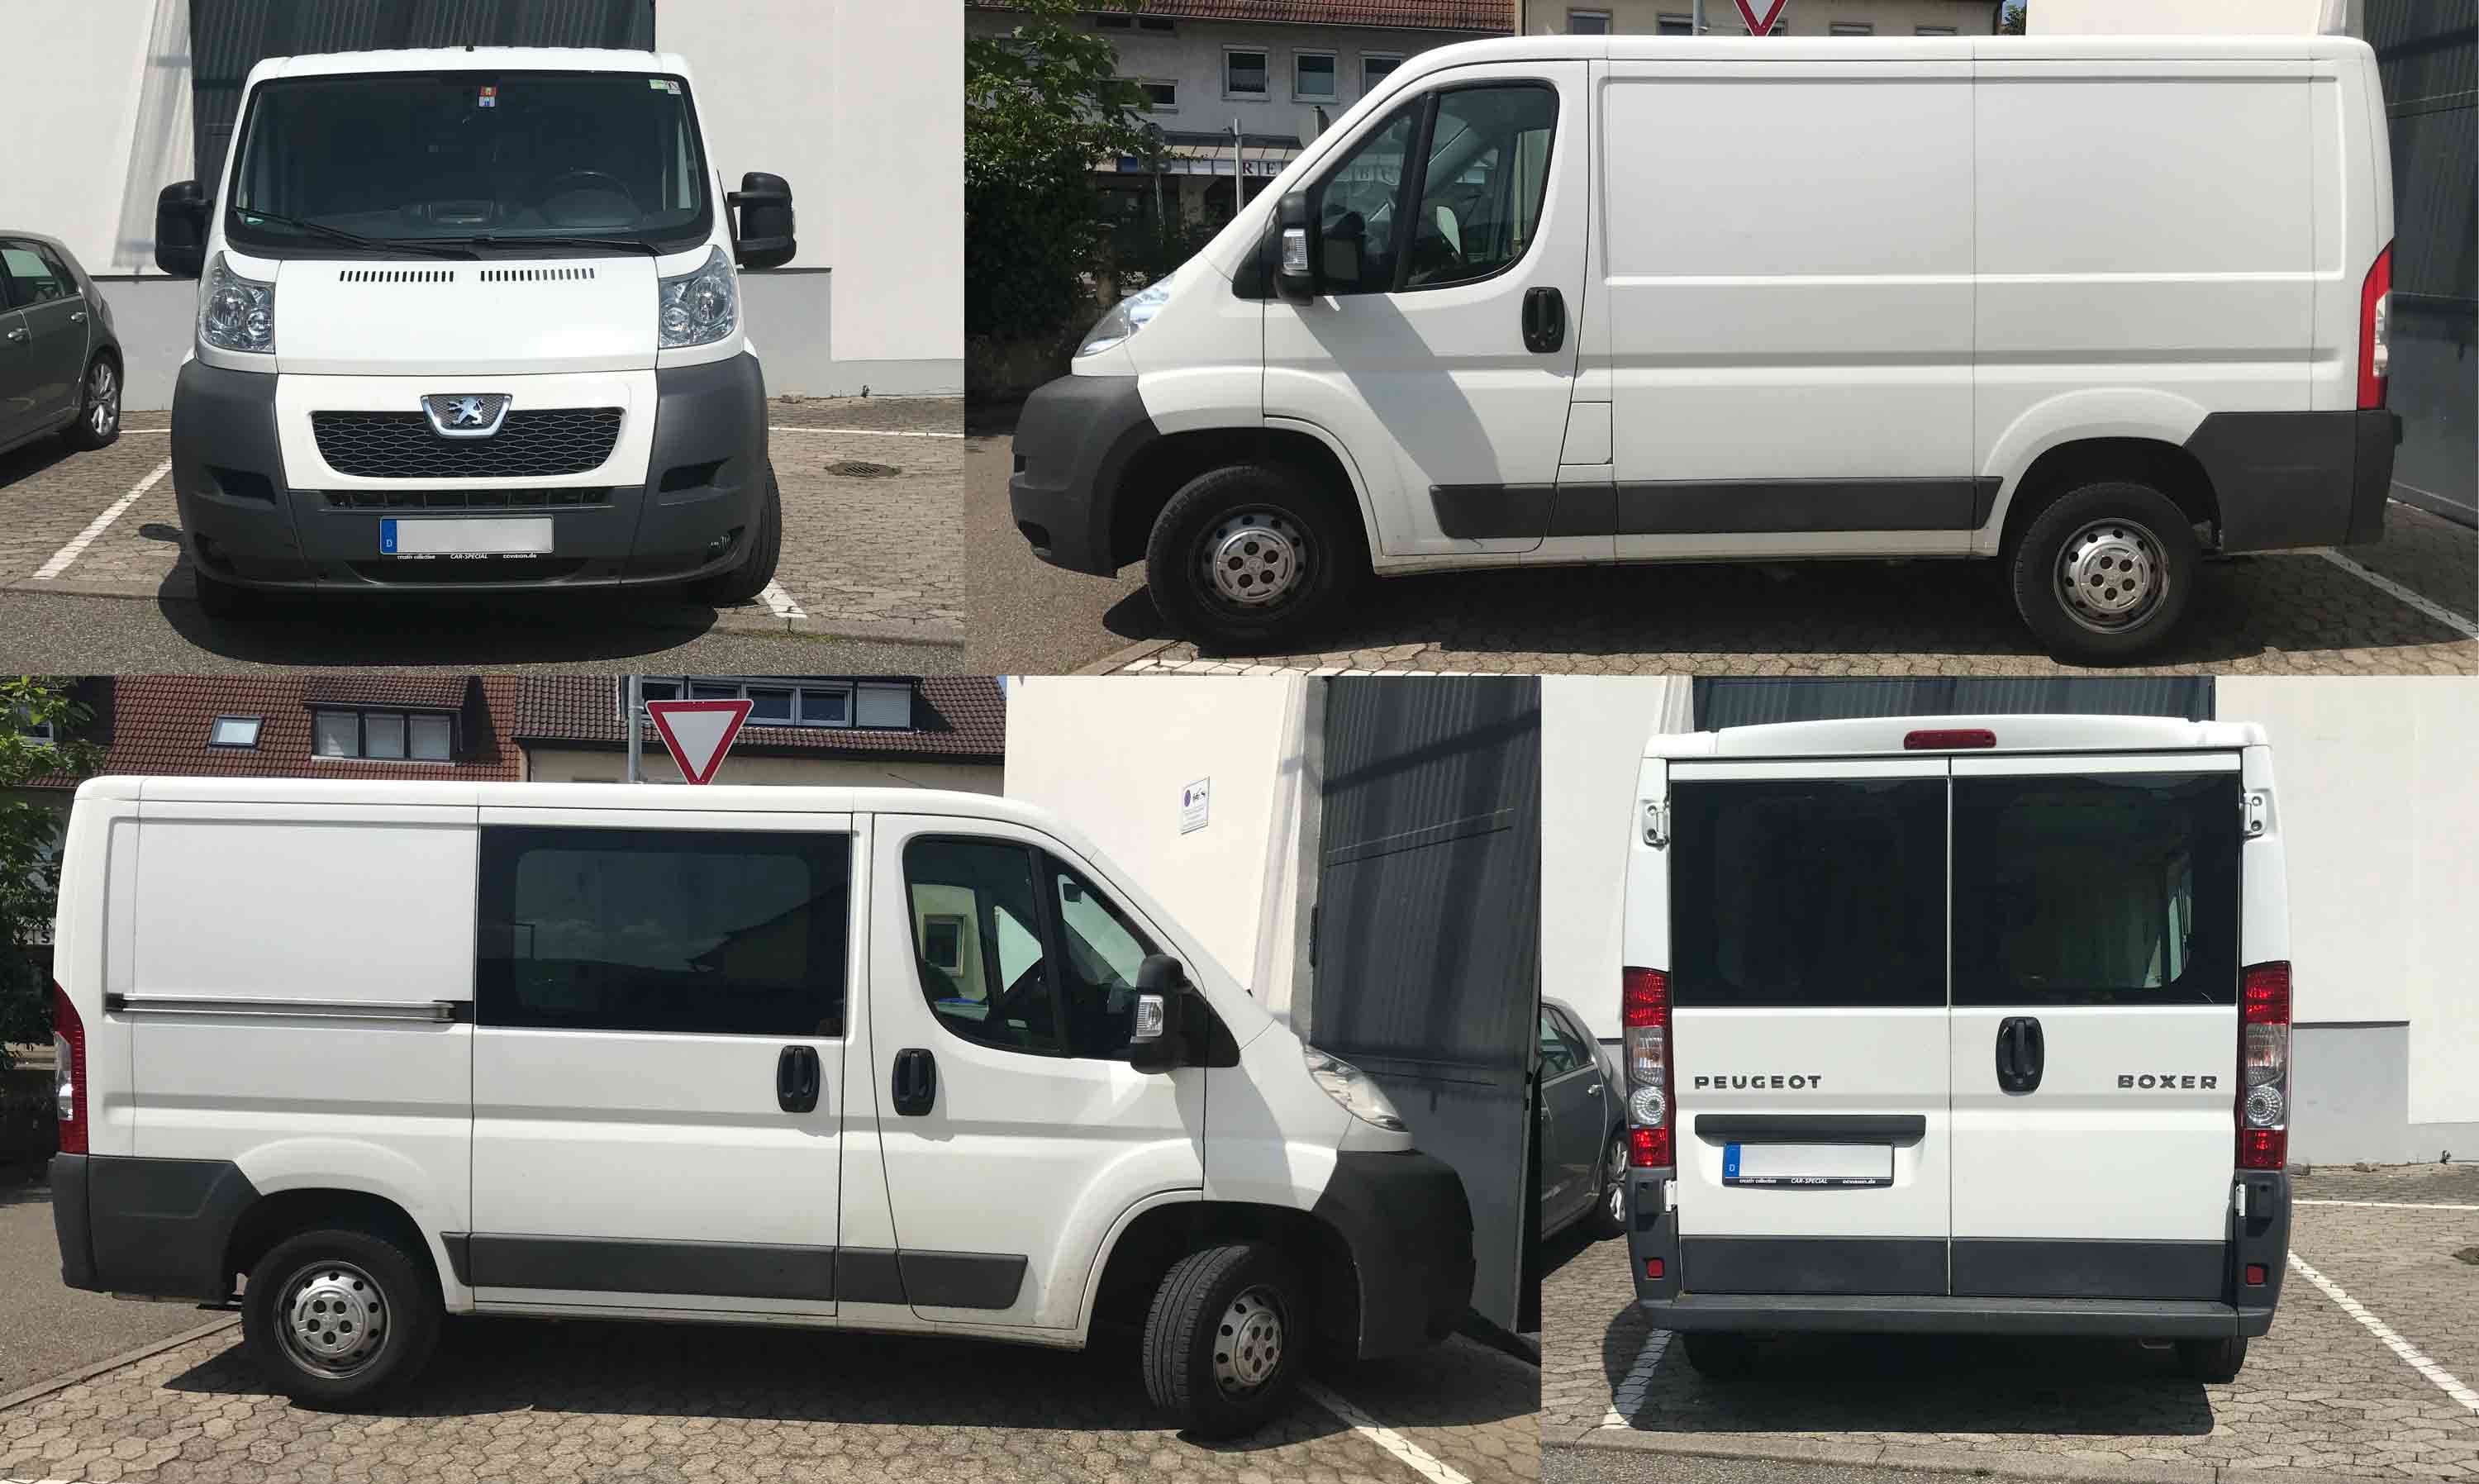
Find vehicle drawings from photos only
First select the desired manufacturer and model. Then upload your photos ("compare" tab at the top right). Select the latest model series in the "Model series" filter. The front view is the best way to differentiate between the model series; pay attention to details such as headlights, front apron and sheet metal edges. If it is not the model series you are looking for, select the next one and so on. The rest, such as body shape, doors etc., is then child's play.
Tip: Model designation unclear?
Use the model overview ("A-Z current" tab). Select a manufacturer and sort by "Year of manufacture from". Compare at the maximum zoom level.
Vehicle dimensions – entered in millimetres

Where: Search result, search filter in the left-hand column: Body > length, height or wheelbase
How: Click in the dropdown box at the bottom on “Enter length in mm” (or height or wheelbase …)
Year of manufacture, not first registration!
The year of construction is crucial for choosing the right vehicle. The date of first registration can be misleading, as vehicles are sometimes not registered until the year after they are built.
New model in the same year? Differentiate between model series/facelifts
If a model change or facelift has taken place within the selected year of manufacture, a note is displayed to avoid confusion. Pay attention to the following distinguishing features:
- Year of manufacture: up to or from the selected year of manufacture
- Model series: Use the search filter and look out for the addition "facelift" if necessary.
- Changed design: best recognised by the front end
Facelift/special model
With a facelift or special model, the body usually remains the same, only the lighting and add-on parts are changed. The biggest changes mainly affect the "face" of the vehicle, i.e. the headlights and front end. If the shape of the headlights is changed, the sheet metal cut-out must of course also be adapted. In rare cases, the bonnet may have to be lowered, for example. If you only want to apply stickers to the sides and rear, it generally does not matter whether it is a facelift or not. The same usually applies to special models or equipment variants. If a particular model variant is not available from us, you can also fall back on the basic version. But as always: measure first, then plot.
New model/new series
Major changes or even a completely new design are to be expected here.
Major changes or even a completely new design are to be expected here.
Differences – electric, hybrid, plug-in hybrid ...
The body is always the same, the difference is only in different fuel tank and charging flaps:
All-electric (electric, EV, BEV):
A charging flap for electricity, sometimes hidden under emblems.
Plug-in hybrid (PHEV):
Two flaps (fuel and charging flap), mnemonic: plug in = insert charging plug.
Full hybrid (hybrid, mild hybrid, fHEV, mHEV sHEV):
A fuel filler flap. In contrast to the plug-in hybrid, only electricity generated while driving is used, so there is no additional charging connection.
Scale vehicle display size

You can decide for yourself which view(s) you want to see:
e.g. all, or only the front and left side. You can also freely select the display size on your monitor using the slider.
Bookmark vehicles

Where: "Watchlist" tab (right-hand side)
How: Simply drag the desired vehicle into a lightbox.
The lightbox must be opened (click on the arrow next to the lightbox name).
Create new watchlist
Where: "Watchlist" tab (right-hand side)
How: Click on "create new watchlist ..."
Sort watchlists

Where: "Watchlist" tab (right-hand side)
How: Click on a watchlist, move it up or down
Delete vehicles from a watchlist

Where: "Watchlist" tab
How: Click on a vehicle and drag it from the watchlist
Login, download
Problem with login/password
Problem with login/password
Important: Only log in with the e-mail address you provided when purchasing the subscription. See also further troubleshooting tips.
Download - how do I download vehicles?
As a CAR-SPECIAL® subscriber, click on the green download button next to the desired vehicles. Note: If you see yellow shopping basket buttons, you must first log in.
If you are an individual buyer, please click on the yellow shopping basket button. After completing the order process, you can download the purchased vehicles directly. Alternatively, you can also use the link in the order confirmation e-mail. This is active for 72 hours.
You will receive the vehicle files in compressed ZIP files. Depending on your browser settings, these will either be saved in the "Downloads" folder on your computer or you will be asked in which directory they should be saved. To edit the vehicle files, you will need a vector programme such as CorelDRAW or Adobe Illustrator or a plotting programme.
Design and presentation
Programmes - which are suitable?
Programmes - which are suitable?
All common vector programmes, including plotting programmes, are suitable for opening and editing the vehicle drawings. Adobe Illustrator or CorelDRAW are ideal. See for yourself and download free test files here.
You can also open vehicle drawings in image editing programmes such as Corel PHOTO-PAINT or Adobe Photoshop. However, this is not recommended as the scale is lost and the drawings are converted into pixels. As a result, they can no longer be edited in a meaningful way.
Attention: Text programmes such as Word are not suitable.
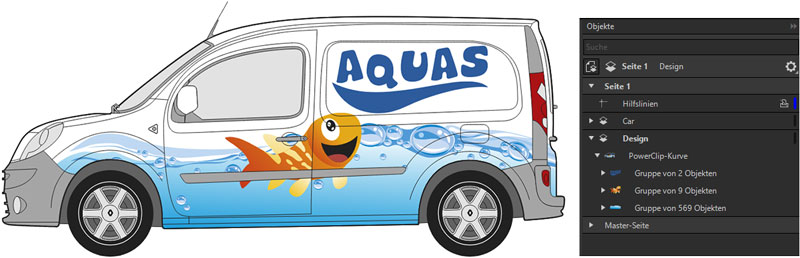
Create vehicle designs with CorelDRAW
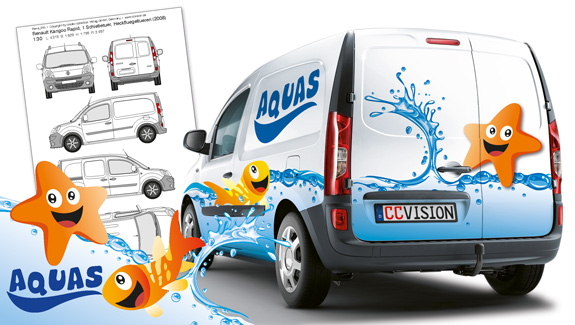
(The illustrations used are from the creativ collection Butterfly®)
Place design
- Open the desired CAR-SPECIAL® vehicle drawing in CorelDRAW.
- Open Window > Docking window > Objects.
- Create a new layer above the vehicle and place your design on the new layer.
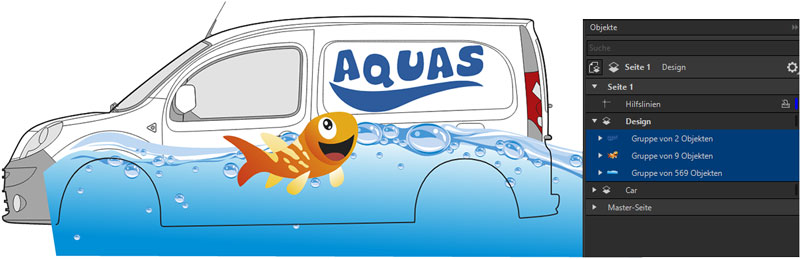
Create a clipping mask
- Click on the white painted area of the vehicle with the selection tool (arrow) while holding down the Ctrl key and select "No fill" in the colour palette.
- Copy the painted surface to the clipboard (Command + C).
- Click on your design and paste the painted area over it (Command + V).
- Select your design elements with the selection tool (arrow). Select Objects > PowerClip > Place in frame.
- Click on the paint area with the black arrow.
- In the layer palette, drag the layer with the masked design below that of the vehicle - done!
Tips
- If your vehicle is not white, copy the paint area again, paste it under your design and colour it in the desired colour.
- To edit your design, expand the layer palette with your design by clicking on the arrow in front of it. You will now see the individual elements of your design and can edit them easily.
- To add more designs, hold down the "W" key and drag them onto the PowerClip (your masked design).
Create vehicle designs with Adobe Illustrator
(The illustrations used are from the creativ collection Butterfly®)
Place design
- Open the desired CAR-SPECIAL® vehicle drawing in Adobe Illustrator.
- Show the layer palette.
- Create a new layer above the vehicle and place your design on it.
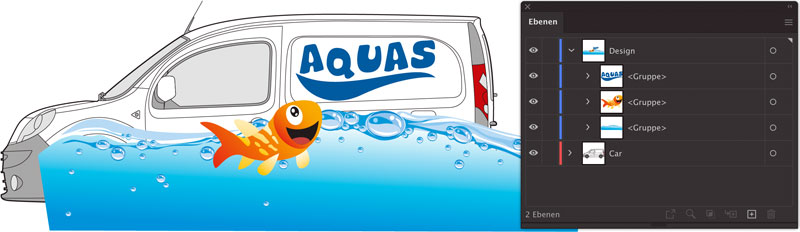
Create a clipping mask
- Using the group selection tool (the arrow with the plus sign), click on the white painted area of the vehicle and select "None" as the area colour in the colour palette.
- Copy the painted surface to the clipboard (Command + C)
- Click on your design and paste the painted surface over it. Important: use "Command + F" to paste it in the same place!
- Use the selection tool (black arrow) to select your design and the lacquer surface above it.
- Select Object > Clipping mask > Create (Command + 7).
- In the layer palette, drag the layer with the masked design below that of the vehicle - done!

Tips
- If your vehicle is not white, copy the painted area again, paste it under your design and colour it in the desired colour.
- To edit your design or add more motifs, expand the layer palette with your design by clicking on the arrow in front of it. You will now see the individual elements of your design and can edit them easily.
Adobe Illustrator - Show sublayers

If no sub-layers are visible in the layer palette, they can be displayed as follows: Click on the menu icon in the top right-hand corner of the Layers palette and then on "Control panel options ..." in the pop-up window at the bottom. Remove the tick in front of "Show layers only".
Bodywork for lorries and commercial vehicles
Red = body (in this example, a swap body), Blue = subframe for mounting swap bodies
The superstructures are manufactured by specialist firms – often customised to the customer’s requirements. We therefore offer you a selection of typical variants here. As a rule, they are not manufacturer-specific, meaning they can be used on various vehicles.
Position the body on the vehicle drawing

A box body can be easily adjusted; the required subframe is shown in blue on the right
First, select the required vehicle and then the desired body (1:60 for lorries and 1:30 for cars or commercial vehicles). Adjust its length and height as required and place it on the chassis.
Adjusting the body
Example: You need a box body with a real-world length of 450 cm for a commercial vehicle (scale 1:30). In the drawing, it must therefore be 15 cm long (450 cm : 30 = 15 cm).
Subframe for bodywork
A subframe is required for vehicles with an open ladder frame. You can easily represent this in the drawing as a simple rectangle and position it between the frame and the body, and behind the wheel (see illustrations above).
Height of the subframe
- Commercial vehicles > Original height: approx. 90 to 120 mm, drawing (1:30): approx. 3.5 mm
- Lorries > Original height: approx. 120 to 200 mm, drawing (1:60): approx. 3.0 mm
Which body type fits which chassis?

Chassis |
Flatbed chassis |
|
| Distinguishing feature | Open design; the ladder frame with its longitudinal beams is visible | Enclosed area |
| Typical body types | Box body, flatbed, tank bodies, cranes, etc. | Box body with cut-outs for wheels |
| A subframe is required | yes (exception: self-supporting box bodies with integrated cross-member) | No |
Please take care with the design!
Some box bodies have a wide, all-round frame structure made of anodised aluminium or rough-textured plastic. These profiles are not suitable for wrapping.
Create commercial vehicle variants yourself

We attach great importance to offering as many current models as possible. Many commercial vehicles are available in hundreds of variants, with more often being added later. It can therefore happen that a particular version is still missing.
Method 1: Recolouring
The window cut-outs on commercial vehicles are always the same, regardless of whether they are closed or glazed. It is therefore possible to transform a window into a sheet metal wall and vice versa by recolouring.
Method 2: Combine
You can interchange side and rear views of different models within a series. For example, you can create a version with a tailgate from a vehicle with rear doors. Important: Ensure the correct vehicle length and height!
Method 3: Mirroring
If you have a vehicle drawing with one sliding door, you can create a version with two or no sliding doors by mirroring it. Make sure to remove any mirrored tank or loading flaps.
Vehicle foiling – tips
You will find useful information and background knowledge on vehicle foiling, vehicle lettering and car wrapping in the section Vehicle Foiling – Tips
CAR 3D - Presentation
Here you can find the detailed help for CAR 3D - Presentation
Design vehicles online with CAR-SIGNER

Where: Vehicle search result, link “Open in CAR-SIGNER”, next to the file number
How: Click on the link to create a vehicle layout online.
Note: This function is only available for subscribers
Here you will find detailed help for CAR-SIGNER
More tips ...
In our Tips for car wrapping, you’ll find plenty of design ideas, information on working with colours and typography, as well as guidance on preparing print files and much more.
Vehicle drawings – technical information
File format – in which file formats do I receive my blueprints?
File format – in which file formats do I receive my blueprints?
You receive each vehicle in five file formats:
- EPS (Encapsulated Postscript)
- AI (Adobe Illustrator)
- CDR (CorelDRAW)
- CDR 1:1 (CorelDRAW in original size)
- DXF (AutoCAD)
The CDR 1:1 file format is not used for 3D presentation files as it is not suitable for 3D.
Vehicle files - which dimensions are specified?

In all files you will find the length (L), width (B), height (H) and wheelbase (R) of the vehicle in millimetres as well as the scale used (in this example 1:30).
Vehicle information

All important information such as year of manufacture, body shape, glazing, dimensions etc. can be found in the search results to the left of the images.
Vehicle dimensions - deviating specifications
The dimensions of our vehicle drawings are based on the manufacturer's specifications. However, the information in the vehicle documents can sometimes deviate by a few centimetres. There are many reasons for this: the information in the vehicle documents is not always one hundred per cent reliable. It can also be due to add-on parts such as towbars or running boards. Another possibility is that the vehicle is lowered or has a stronger suspension for a higher payload. However, the body always remains the same.
Almost all commercial vehicles are offered in different lengths (e.g. L1/L2/L3 or standard/long). As a rule, the differences in length within a model series are at least 30-50 cm.
Tip: If two lengths are specified in the vehicle documents, always select the smaller dimension when searching for the vehicle drawing.
Precision – do I have to verify the measurements on the vehicle?
The vehicles are true to scale and drawn with high precision. However, curves and beadings are displayed deficiently in a two-dimensional file. Therefore, it is absolutely necessary to verify the measurements on the original vehicle before you plot the Letterings. Our company cannot assume liability for measurement differences.
Attention: Lorries are always individually configured!

Manufacturers often only supply trucks as a chassis (chassis with engine and cab). The actual body - for example, box body, refrigerated body, special frame or crane - is usually assembled by body manufacturers such as Schmitz Cargobull or Krone. However, even pre-configured articulated lorries are individual; there is practically no real "standard configuration".
Differences result from, among other things
- Cab height and width
- Roof spoilers, side flaps and aerodynamic packages
- Assistance systems
- Ventilation grilles and slots
- Radar, camera and sensor systems
Modern lorries are available in countless variants. However, we can only offer basic models as templates. Without the vehicle on site or without meaningful photos, every design involves a certain amount of risk. If neither the vehicle nor photos are available at the start of the design, the only option is a fault-tolerant, flexible design approach.
Pragmatic solutions:
- Request manufacturer data sheets (not just offer descriptions).
- Clarify superstructures specifically, especially for refrigerated boxes, swap bodies or special frames.
- Create a generous and modular design (facilitates later adjustments and follow-up orders).
- Allow for buffer zones: additional trimming at edges and transitions
- Do not place any hard lines over component transitions (spoilers, cabin joints, wind deflectors).
- Deliberately leave out sensor and spoiler areas instead of including them in the design.
- Pay attention to the choice of material: Highly mouldable 3D wrapping films should be used for beading, ventilation grilles and deep contours. On flat surfaces, a standard premium film may also be sufficient, depending on the load.
Vehicle drawings for emergency vehicles
We do not offer vehicle templates for police, fire service, ambulance or other emergency vehicles. These vehicles are usually custom-built. Even production vehicles of the same model often differ in terms of roof-mounted equipment, special signalling systems or other attachments. To produce reflective wraps, we either take precise measurements of appropriately modified original vehicles or use manufacturer-specific design data. This is the only way to ensure that cut-outs for door handles, hinges, sensors and other components are accounted for with millimetre precision.
Our vehicle drawings are designed for the design and visualisation of vehicle graphics. They are therefore not suitable for the production of emergency vehicle wraps. If you require templates or cutting and production data for an emergency vehicle, please contact the vehicle bodybuilder, the client or the wrapping company carrying out the work. They usually have the necessary data to hand.
Scale – Convert dimensions to original size
The scale used is always indicated in the drawings. This gives you the original size:
| Scale | Scale factor | Vehicles |
|---|---|---|
| 1:15 | 1,500 % or ×15 | Motorbikes and wheels |
| 1:30 | 3,000 % or ×30 | Cars, commercial vehicles (also available as CDR 1:1) |
| 1:60 | 6,000 % or ×60 | Trucks, buses, trains and boats |
| 1:300 | 30,000 % or ×300 | Aircraft |
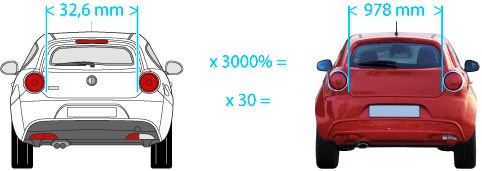
Example: You measure a length of 32.6 mm in the drawing of a car. Multiplied by 3000% (or by 30), this gives an original size of about 978 mm. Important: The drawings are precise, but can never be accurate to the millimetre, see also here.
Tip: In many programmes you can calculate in the input field: Enter the scaling factor with an asterisk after the given measurement, e.g.: 32.6 mm *30 = 978 mm.